 (Image source: Midjourney)
 Your bedroom is your sanctuary, so why not make it feel uniquely yours? A headboard is more than just a backdrop for your bed; it’s an opportunity to show off your personal style and transform your bedroom into a true reflection of you. The best part? You can skip the store-bought versions and craft a headboard yourself, saving money and adding a personal touch to your space. Whether you love rustic textures, chic fabrics, or artistic details, there’s a DIY headboard project just waiting for you.
Here are some creative and practical headboard ideas to help you get started, along with tips and instructions to bring each to life.
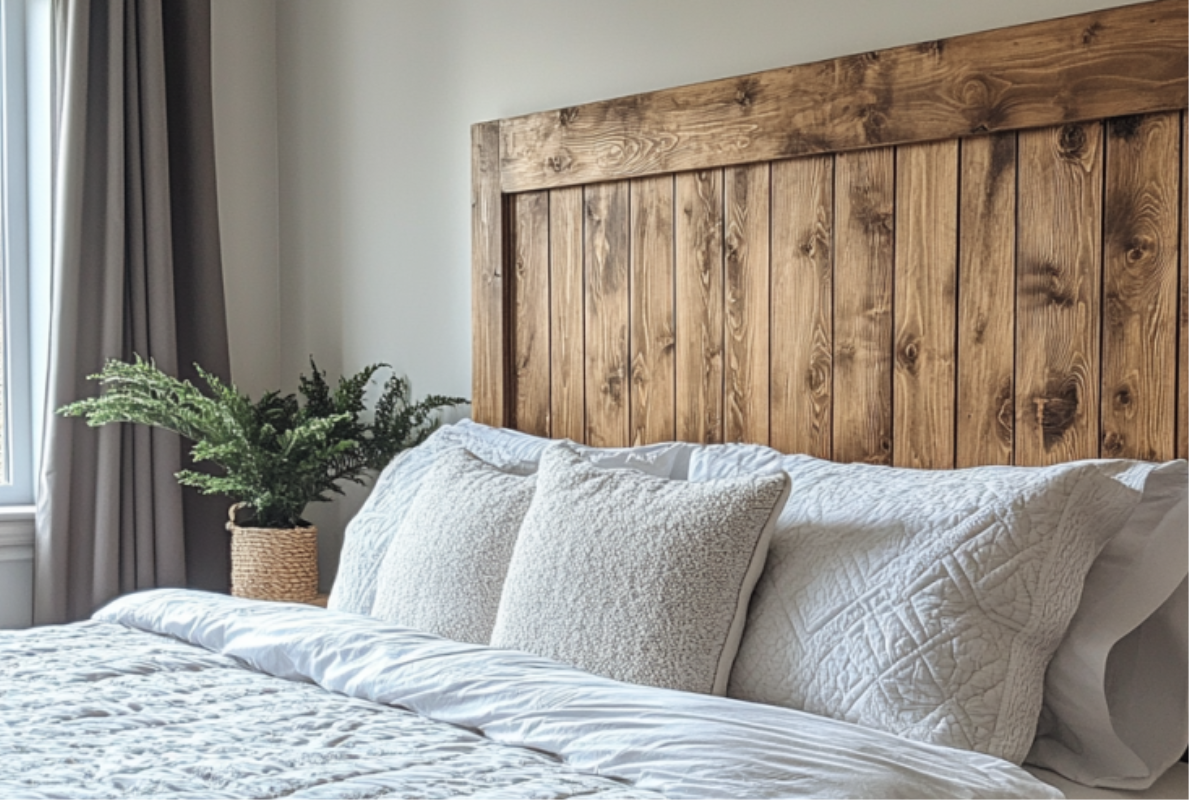
1. Reclaimed Wood Magic
If you’re a fan of rustic or farmhouse décor, a reclaimed wood headboard will add warmth and charm to your space. The best part? It’s sustainable, stylish, and surprisingly easy to make!
What You’ll Need:
- Reclaimed wood planks (or new planks aged with wood stain)
- Sandpaper
- Wood screws and a drill
- Measuring tape
- Mounting brackets
Instructions:
- Measure the width of your bed and decide how high you want the headboard to go.
- Sand the wood planks to remove splinters while keeping the rustic character intact.
- Arrange the planks horizontally to create your design, staggering the lengths or keeping them even, depending on your style.
- Attach the planks together using wooden support beams on the back. Secure with screws.
- Mount the completed headboard to the wall using brackets or attach it directly to your bed frame.
Style Tip: Use distressed wood for a shabby-chic look or stain the wood for a more polished vibe. String some fairy lights across for added coziness!
2. Cozy Upholstered Panels
Want a softer, more luxurious feel? Upholstered panels are a fantastic way to add comfort and sophistication to your bedroom without breaking the bank.
What You’ll Need:
- MDF panels or sturdy foam boards
- Upholstery foam
- Fabric of your choice (velvet, linen, or patterned cotton work great!)
- Staple gun
- Mounting strips or hooks
Instructions:
- Cut your MDF or foam boards into equal-sized panels that align with your bed’s width.
- Cover each panel with a layer of upholstery foam for softness.
- Tightly drape your chosen fabric over the foam and secure it at the back with staples.
- Arrange the panels in a grid or line above your bed and mount them to the wall using adhesive strips or hooks.
Pro Tip: Experiment with different fabric patterns and textures. Try jewel tones for drama, or keep it neutral for a minimalist look.
3. Painted Mural Headboard
If you have a creative streak (or are willing to try!), paint your headboard directly onto the wall above your bed for a completely custom and artistically inspired look.
What You’ll Need:
- Painter’s tape
- Paint brushes or rollers
- Wall paint or acrylic paint in your chosen colors
- A level
Instructions:
- Use painter’s tape to outline the shape of your headboard on the wall. This could be a simple rectangle, an arched design, or even something whimsical like a cloud shape.
- Paint inside the taped outline with your chosen color(s). Bold contrasts, ombre effects, or pastel hues can all work beautifully.
- Wait for the paint to dry, then carefully remove the tape for crisp, clean edges.
Style Idea: Add stenciled patterns, geometric designs, or even freehand illustrations to make it truly one-of-a-kind.
4. Woven Tapestry Headboard
For a boho-chic vibe, try using a woven tapestry, large macramé piece, or even a lightweight rug as your headboard. This is a quick, no-tools-needed option that adds instant texture and charm.
What You’ll Need:
- Macramé or woven wall hanging, or a decorative rug
- A dowel rod or curtain rod
- Hooks or a mounting bracket
Instructions:
- Choose a tapestry that complements your bedroom’s color palette.
- Hang it on a dowel rod or curtain rod for stability.
- Mount the rod on the wall above your bed, allowing the tapestry to drape down to the desired height.
Pro Tip: Add hanging string lights along the rod to double the cozy factor.
5. Shutter or Door Headboard
Old shutters or doors can make the perfect upcycled headboard for a vintage-inspired room. Their unique shapes and worn finishes add character and charm.
What You’ll Need:
- Two or three wooden shutters or a vintage door
- Sandpaper
- Paint or wood stain (optional)
- Mounting brackets
Instructions:
- Clean and sand the shutters or door to remove dirt and rough patches.
- Paint or stain to match your room’s aesthetic, or leave them weathered for a rustic vibe.
- Arrange the shutters or doors vertically or horizontally behind your bed and secure them to the wall using brackets.
Quick Hack: Place multiple shutters side by side for larger beds or layer doors of different heights for an eclectic touch.
6. Bookshelf Headboard
For practical types, a DIY bookshelf headboard adds storage space as well as style.
What You’ll Need:
- A standard bookshelf unit that matches your bed’s width
- Paint or wood stain (optional)
- Drill and mounting hardware
Instructions:
- Choose a sturdy bookshelf and customize it with paint or stain if needed.
- Secure the shelf flat against the wall behind your bed or attach it to your bed frame.
- Fill the shelves with books, plants, or decorative items to add both function and flair.
Pro Tip: Add small under-shelf lights for a cozy glow and easier nighttime reading.
7. Pallets with Personality
Wooden pallets are endlessly versatile and provide a rustic-yet-modern base for a DIY headboard.
What You’ll Need:
- 2-3 wooden pallets
- Sandpaper
- Paint or stain (optional)
- Screws or brackets
Instructions:
- Sand the pallets to remove splinters and rough edges.
- Paint or stain them to fit your bedroom’s color scheme, or keep them natural for a rustic aesthetic.
- Stack the pallets vertically or arrange them horizontally behind your bed. Secure them to the wall if needed.
Creative Hack: Integrate rope lights or fairy lights into the pallet slats for a glowing, magical effect.
8. Fabric Canopy Headboard
Nothing says dreamy like a fabric canopy cascading behind your bed as a faux headboard.
What You’ll Need:
- Sheer curtains or lightweight fabric
- A curtain rod or hooks
- Wall mounts
Instructions:
- Mount a curtain rod or hooks on the wall a few inches wider than your bed.
- Drape the fabric or curtains across the rod and style them to flow down to the floor or end just above your pillows.
Quick Fix: For a touch of sparkle, thread fairy lights around the rod behind the fabric.
Your headboard is more than just a functional piece of furniture; it’s an opportunity to show off your creativity and personality. From rustic reclaimed wood to soft upholstered panels and artistic painted murals, there’s no limit to what you can do. Best of all, these DIY headboard ideas are affordable, fun to create, and entirely customizable to fit your space and style.